Thursday, February 26, 2015

Zucchini Goat Cheese Tarts

This recipe is from my sister. I haven't actually made it yet myself, but a few days after my sister told me about it, I got a call from my mom who wanted to tell me about this awesome recipe my sister gave her. So, actually this is a guest post from my sister Francesca, but she asked me to write it up since she doesn't enjoy it as much as I do, and after completing her Master's degree and thesis in chemistry she's all written out. The format of this recipe may be a little bit different due to containing only the pictures she gave me and her instructions.

Without further ado here is her recipe.

You will need:
Puff Pastry (I get the frozen Pepperidge Farm kind that my Winco carries. To be honest, even though I usually say making everything from scratch is better, there are a few things where the time and effort just isn't worth it, puff pastry is one of those, wanton wrappers is another.)
Soft Goat Cheese of your choosing
1 Zucchini
1 Egg
1/2 Small Chili Pepper
Fresh Mint

Lay out your defrosted sheet of puff pastry flat.
I suggest getting that out either on the counter for an hour or two or in the fridge for about a day or so before you want to use it. You can use it straight from the freezer, but when it's frozen it's less malleable and more prone to cracking and tearing when you unfold it.
Once it's been laid flat you will use a knife to slightly slice an edge around the puff pastry. You don't want to cut all the way through the layer, only part way through as a defining line. This cut will then also ensure that the edge puffs up and creates almost a type of crust on your tart.
You can see where my sister edged the puff pastry.

Now use your egg to create an egg wash. The reason I did not add an additional recipe is, because you can make an egg wash by mixing an egg and a bit of water together. However I like to mix my egg with milk instead. So either way works. My sister may have not even added any additional liquid and just whisked the egg on its own.
Use a pastry brush to brush the defined edge of your pastry dough with the egg mixture. This is another reason you will see a type of crust on your pastry.

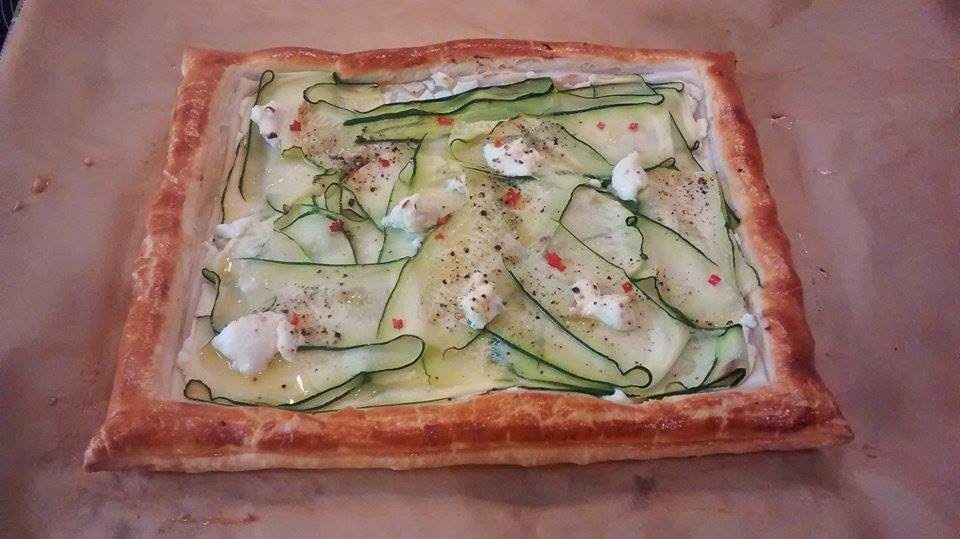
Then take your soft goat cheese and spread it all over the inner square.

What you are going to do with the zucchini is using a peeler to shave thin slices down the length of the zucchini like this:

Layer the zucchini shavings over the square where you put down your goat cheese. You can then also sprinkle it with the cut up chili pepper. Also sprinkle it with a little bit of olive oil, salt and pepper.
She had some extra goat cheese and added dollops of it on top. You can totally do that. You know me, the more cheese, the better!

Now bake it in your oven at 350 degrees Fahrenheit (180 Celsius) for approximately 15 minutes, or until your pastry looks golden brown.
Once it has been baked, you can serve it with some fresh mint.


Here's the quickie summary:


You will need:

Puff Pastry
Soft Goat Cheese of your choosing
1 Zucchini
1 Egg
1/2 Small Chili Pepper
Fresh Mint
Lay out your puff pasty dough.
Slice an edging around the entire square to form an edge/crust.
Make an egg wash (whisk egg, add water or milk).
Brush the egg wash around the edge.
Spread the goat cheese on the inner square.
Peel layers of zucchini down the length of the zucchini.
Chop up the half chili pepper.
Layer zucchini shavings over the goat cheese.
Sprinkle with a bit of olive oil, chili pepper, salt, and pepper.
Bake at 350 for about 15 minutes plus minus.

Tuesday, February 24, 2015

Spaghetti Bolognese

Now most of you will say: who needs a recipe for regular old spaghetti? You may have a point, but since I get so many compliments on mine I'm gonna sock it to you anyway. Because I said so! (Hah, couldn't resist practicing for eventual motherhood.)
The funny thing about this spaghetti is that I didn't learn it from my mom, the big cook, but rather from my dad her dedicated sous chef. My mom pretty much hates ground beef and isn't huge on tomatoes either. Having spaghetti was a fun treat for us when mom was gone and dad was in charge. Much much better than his improvised Indian style shrimp. My poor dad, I guess I've always been a snarky know it all. He tried so hard, and was so proud that he was creative in the kitchen. I had like two bites and asked him for the recipe. He was so excited until I continued and ended my sentence with: "...so I can make it and feed it to my enemies!" Over dramatic 10-year-olds. Now I feel like I should call my dad and apologize for being a little shit and crushing his cooking creativity.

Anyway, maybe we should start with the cooking instead of rambling about my childhood.

Here's what you'll need:
Ground beef large pack (I prefer lean so my sauce doesn't get so greasy)
Spaghetti noodles (honestly you can make this with whatever noodles you have handy)
2 large cans crushed tomatoes
1 small can petite diced tomatoes (You can get them with Italian seasoning, or with chilies for an extra kick)
1 can tomato paste (they usually come in tiny and small, I like the bigger version)
2 cans mushrooms, or fresh when you can get them
Red wine (Can be omitted or substituted with white wine, red is just more traditional)
Worcestershire Sauce
Mustard
Italian Seasoning (or separate: oregano, thyme, basil, rosemary, marjoram)
Paprika
Cayenne (You'll notice I pretty much put that on everything)
Salt & Pepper
(If you want, a shot of soy sauce, maggi, or both)

I make my sauce in a big dutch oven, as I only know how to make it in quantities that will feed armies... ;) I used to make it in a sauce pan, which you totally can, I just find this handier, since dutch ovens (or rather my french oven, oh, la, la) are really my go to work horse. Nowadays when I cook I almost always use my dutch oven, sometimes even in baking like this bread here. This bread would also be perfect to turn into garlic bread to go along with your spaghetti.

As usual I like to preheat my dutch oven and preseason my meat with all the dry spices (salt, pepper, cayenne, paprika, and Italian seasoning) on one side.

Now toss the meat seasoned side down into your dutch oven.
And add another layer of seasoning on top. I like to add lots of seasoning throughout the process.

Brown your meat until it's mostly cooked.

Now deglaze your pot with some red wine. A cup, more or less, however much seems right to you.
Let most of the alcohol boil off, so you have the concentrated flavors, but not the alcohol taste.

Now you can add your canned tomatoes (crushed and diced)

I now also add the liquid seasonings: mustard, Worcestershire sauce, and soy sauce and/or maggi.

Now I add some more of the Italian seasoning, paprika, and cayenne because I like spices and herbs.


Just because I thought it was a little bit pretty you get a close up pic too.

Once that's all mixed in together, I add in the shrooms. You could add the mushrooms earlier, it doesn't really matter. But now seems as good of a time as any.

Now I also add my tomato paste. The purpose of it is, that it will help thicken the sauce.

Since I like a thicker chunkier sauce I will let it simmer for some time to help it thicken up. This particular sauce has a bit higher tomato to meat ratio than I would usually do, but they are making the meat packages a bit smaller at the store now. This is again kind of up to you to see what your personal preference is.


Serve and enjoy:


Quickie Summary:

Ingredients:
Ground beef ca. 2-3 lbs (I prefer lean so my sauce doesn't get so greasy)
Spaghetti noodles
2 large cans crushed tomatoes
1 small can petite diced tomatoes
1 can tomato paste (they usually come in tiny and small, I like the bigger version)
2 cans mushrooms, or fresh when you can get them
Red wine (Can be omitted or substituted with white wine, red is just more traditional)
Worcestershire Sauce
Mustard
Italian Seasoning (or separate: oregano, thyme, basil, rosemary, marjoram)
Paprika
Cayenne
Salt & Pepper
(If you want, a shot of soy sauce, maggi, or both)

Season, then brown meat..
Add more seasonings.
Deglaze with wine.
Let the alcohol cook out.
Add crushed and diced tomatoes.
Add more seasoning.
Add mustard, Worcestershire sauce, soy sauce and maggi if you choose.
Add your mushrooms.
Add tomato paste to thicken the sauce.
Simmer down until you've reached the desired consistency.


Sunday, February 22, 2015

Delay

Hello Folks, due to some work emergencies needing my attention tonight's recipe will be posted tomorrow evening. Sorry about that!

Sunday, February 15, 2015

Shepherd's Pie

The first time I ever had Shepherd's Pie was when Brandy (My husband's brother's girlfriend and the mother of his child) made it. Apparently Brandy's sister Brittany taught her how to make it. I don't know if I make it the same way they do, but it reminds me of her. Sadly Brandy recently passed away in a horrific car accident, leaving her 3 children (Nita, Emma, and Carl) as well as my brother-in-law Joey behind. For me This dish is a good memory of Brandy to have and a way to honor her as a caring mother that she was. So here is my tribute to Brandy.
So, now that we're done with all the heavy stuff, lets get cracking!

Ingredients:
Cream (heavy whipping)
Butter
Potatoes
Shredded Cheese
Ground Beef
Green Beans
Soy Sauce
Worcestershire Sauce
Ketchup 
(Maggi if you can get it)
Paprika
Cayenne
Italian Seasoning
Salt & Pepper

First you need to make your mashed potatoes.
You'll need: cream, butter, and potatoes.

I peel my potatoes and boil them whole. If you're in a hurry and want them to be done faster you can cut your potatoes into smaller pieces.
Make sure you add salt to your potatoes while they are cooking, as potatoes will absorb a lot of salt. That is why you can add a potato to soups or sauces that you've accidentally oversalted in order to absorb exes salt.

While my potatoes are on the stove I begin cooking my meat. As you may know by now I'm a big fan of seasoning, so I get this whole load ready:
Ketchup, Worcestershire Sauce, Soy Sauce, Maggi, Paprika, Cayenne, Italian Seasoning, Salt, and Pepper.

I like to preseason my meat on one side with the dry seasonings before I throw it into my preheated pot/pan,

The black stuff on here is actually salt.
Charlie's oldest brother Clint and his family gave us this Hawaiian black salt for Christmas amongst other things. It tastes mostly the same as regular salt, but it looks way cooler! Shout out to Clint, Brenda, their daughter Gaby, and especially to their son Justin who picked it out!

OK, back to cooking. I'll stop bragging about my cool family! So you threw your meat into your pot seasoning side down.
Add your second layer of seasoning.

Start breaking up your meat into smaller pieces as you brown it.
Once you've gotten it mostly browned...

...add your liquid seasonings
Ketchup, Worcestershire Sauce, Soy Sauce, and Maggi if you have it.

I just throw in a bunch of squirts of all of them.
You could also add some mustard if you feel like it. I like to cook it down some, so it isn't too liquidy, but I do want there to me some, so it stays nice and juicy. As you will be baking this for half an hour, and you don't want it to dry out.

Once you cooked the meat all the way through, put it in your casserole dish. Your first layer is complete.
Nomms.

Next we are adding the green beans.
So, I used fresh beans. They didn't cook all the way through in the oven, but I like the crunchiness. If you however don't want that texture, you can parboil your beans or use canned ones.

Layer them on top of your ground beef.
You could also use different veggies if you choose. Carrots are really good too, or peas, or anything else you can think of.

Now your potatoes should be cooked. Time to mash those suckers! I'm a big cheater because I have lovely kitchen appliances. I stick it into my kitchenaid and whip it. That makes the potatoes super light and fluffy. However you can totally use a potato masher and do it by hand.
I add a bunch of butter, cream and a bit of salt. I just keep adding butter and cream until it reaches the desired consistency.

See how fluffy it is?

Now layer your mashed potatoes on top of your green beans.
I add globs of potatoes all over the top, and then smooth it out. If you try and spread it, the beans will stick to the potatoes and get dislocated.

Last layer: Add copious amounts of cheese, 'cause cheese!
Stick it in the oven at 350 for half an hour. (Please don't judge my oven, it has spots that can't be cleaned off, believe me, I tried!.)

Now look at your ooey gooey goodness!

My husband holding his first bowl full of Shepherd's Pie.
It's easily reheatable in the microwave and makes for great leftovers! You could also make this whole dish in advance and refrigerate it till you're ready to make it. Just up the cooking time in the oven a bit to make sure it gets heated all the way through.


Quickie Summary:
Ingredients:
Cream (heavy whipping)
Butter
Potatoes
Shredded Cheese
Ground Beef
Green Beans
Soy Sauce
Worcestershire Sauce
Ketchup 
(Maggi if you can get it)
Paprika
Cayenne
Italian Seasoning
Salt & Pepper

Make your mashed potatoes.
Boil your potatoes.
Whip with butter and cream.

Cook your ground beef.
Season it with your dry spices. (Cayenne, Paprika, Salt, Pepper, Italian Seasoning)
Brown the meat.
Add your liquid seasonings. (Ketchup, Soy Sauce, Worcestershire, Maggi if you have it)
Cook it down a bit.
Layer the meat into the bottom of your casserole dish.

Layer your beans on top of the meat.

Layer your mashed potatoes on top.

Sprinkle cheese liberally on top.

Bake at 350 degrees Fahrenheit for half an hour.


Sunday, February 8, 2015

White Chocolate Bark Bites

With Valentine's Day coming up I thought I'd make you a little treat that you still have plenty of time to make before V-Day yourself. These little bark bites are so cute and would make great little Valentine's treats for your child to take to school, or for you to distribute at your work. You could put a few in a little baggie, or individually wrap them in cellophane with a bit of ribbon.

Why don't we jump right on in then?
White chocolate melts (can be called melting wafers) I got mine from the bulk section at Winco, I know Ghirardelli also makes them.
M&Ms ( you'll see I have Valentine's m&ms as well as some mini ones)
Sprinkles or colored sugars (I couldn't find pink and white sprinkles so I just used the sugar)
Silicon mold (I used this heart shaped ice cube tray as well as a pacman one shown below)

So, you need to melt your white chocolate. You can either do it in a double boiler or in the microwave. I kinda rigged my own double boiler because my only metal bowl is waxy at the moment.

I put my chocolate in a pyrex measuring cup.

Bring the water in your pot to a boil.

Place the pyrex cup in it.

OR ALTERNATE VERSION:
Microwave it! This was actually easier and quicker.

Again put your chocolate in a glass measuring cup.
Stir and only microwave in stages. So start with like 30 seconds or a minute. Check on it each time and add additional time. Believe me, my second batch I tried to just do the whole 3 minutes in one go, and it burnt my chocolate in the middle and turned it into a clumpy brown mass. So take the time to do it incrementally.

While you are melting your chocolate you can get your forms ready. I used this heart shaped silicone ice cube tray and it worked fabulously. It's funny, but ice cubes is like the one thing I haven't ever used this form for. Hah. I think I got it at Ikea for pretty cheap, you can probably get them all over the place.

Once you're sure your form is completely dry (You don't want your sprinkles, etc to dissolve) you can start adding stuff. I started with some red and white sugar sprinkles because I couldn't find any actual pink, white, and/or red sprinkles at the store.

Next I added some of the Valentine's Day edition chocolate m&ms.

I also made some non-Valentine's Day ones in my husband's Pacman ice cube tray.
There I used blue sugar sprinkles and the mini m&ms.

Once your chocolate is all the way melted make sure you stir it well.

Now you can pour it into your forms. I choose to overfill mine a little and then to scrape the top to even it out, but you could also underfill it and have them be a little shorter.

You will want to tap the form to even it out, but also to give a release in case there are air bubbles in the melted chocolate.

I let it sit for a while and then refrigerated them for about an hour or two. Once they are completely solid you can start popping them out of their mold, and then refill if desired.

If you've overfilled them like I have, you may need to clean up some of the edges.

All in all I thought they turned out pretty cute.

I sent a couple of the pacman ones with my husband to his DnD group.

Man, this is gonna be the easiest quick summary ever!

White Chocolate Bark Bites:

Ingredients needed:
White chocolate Melts (Also called vanilla melts on occasion)
Sprinkles
M&Ms

Melt the chocolate
Put sprinkles into the molds
Put m&ms into the mold
Pour melted chocolate on top
Tap mold to release air bubbles and to even out
(If you have overfilled scrape excess chocolate off)
Chill
Remove from mold and clean edges if desired/needed