Monday, December 29, 2014

Tea Wreath

This winter out of necessity almost all Christmas gifts were handmade. Pinterest has been a godsend for that. There I found the idea for a tea wreath. I like the original poster's idea, but as usual I kinda took the basic idea and ran with it. A wreath circle with decorated clothespins and a teabag in each pin.
Here is the original idea. She made her  own wreath circle out of cardboard and decorated her clothespins with scrapbook paper. I'm more of a glitter kind of gal.

So, wanna make one of these?
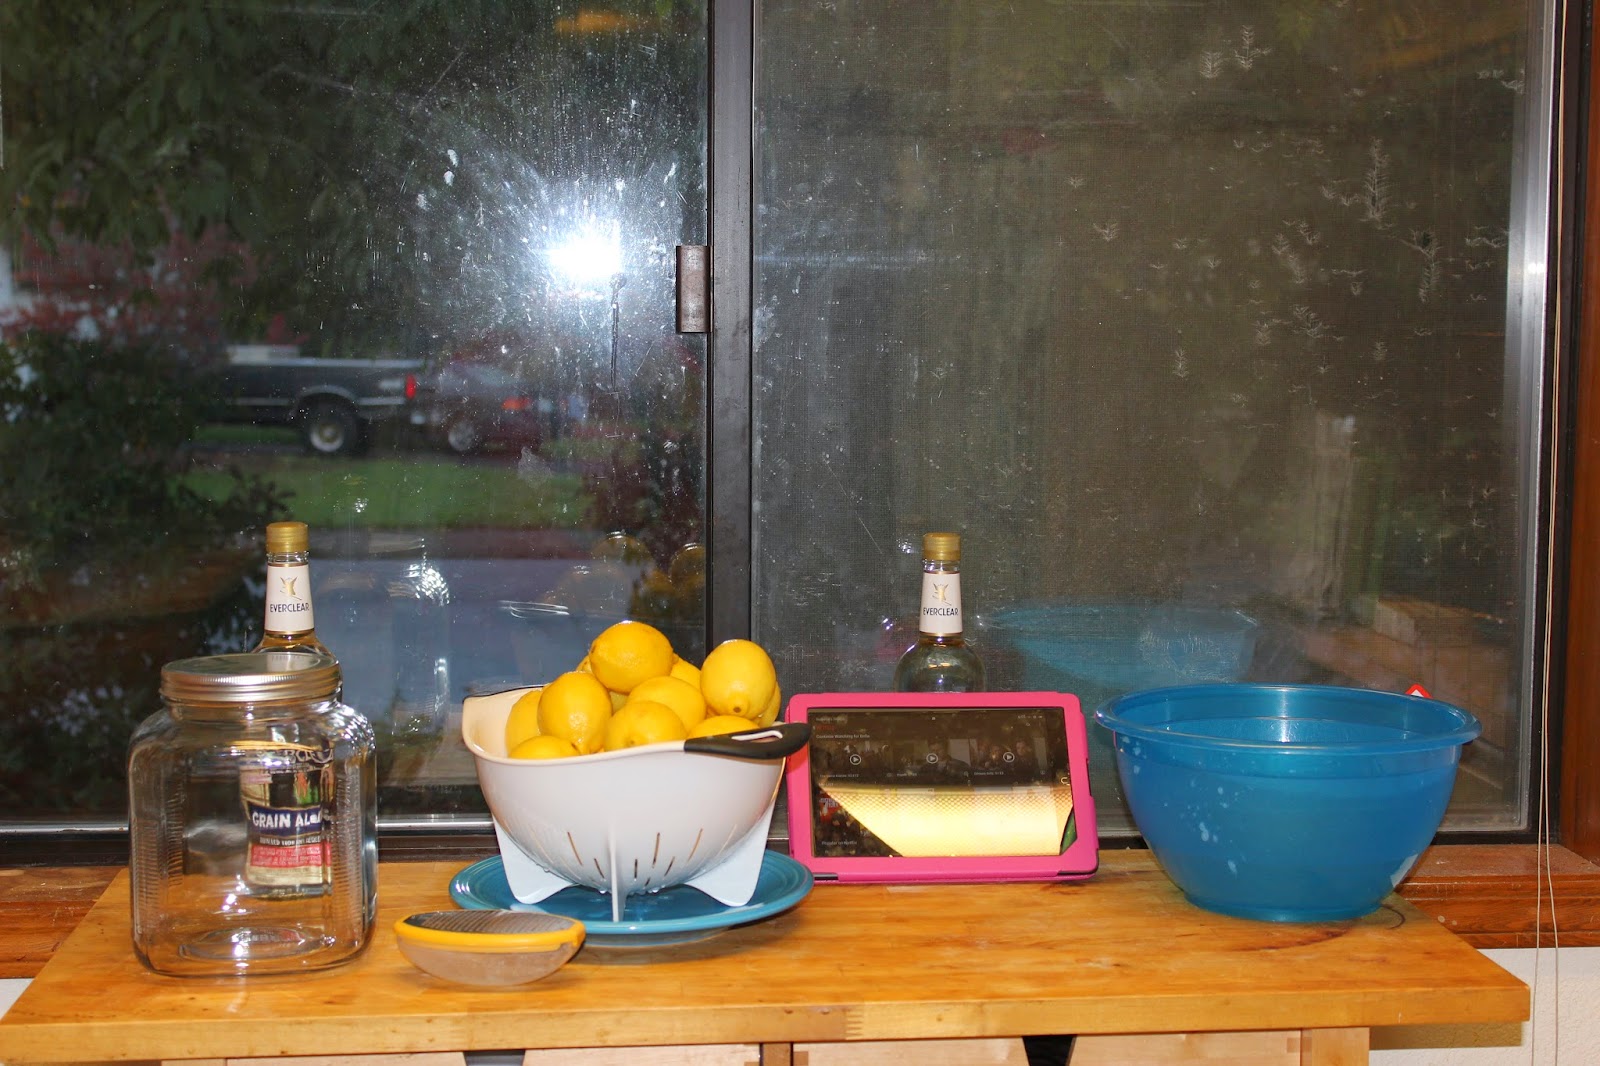
What do you need?

A good selection of glitter. I have these two lovely different sets of glitter by Martha Stewart left over from some crafts I made for the wedding. A little bit of this stuff goes a long way!

A craft ring to use as the base wreath. I got this Biodegradable-Floral-Ring-Glueable-Wreath from amazon, and then painted it purple with acrylic paint.

Wooden clothespins, which I also got from amazon. These are the ones I bought.
Make sure you have some Mod Podge and a hot glue gun.

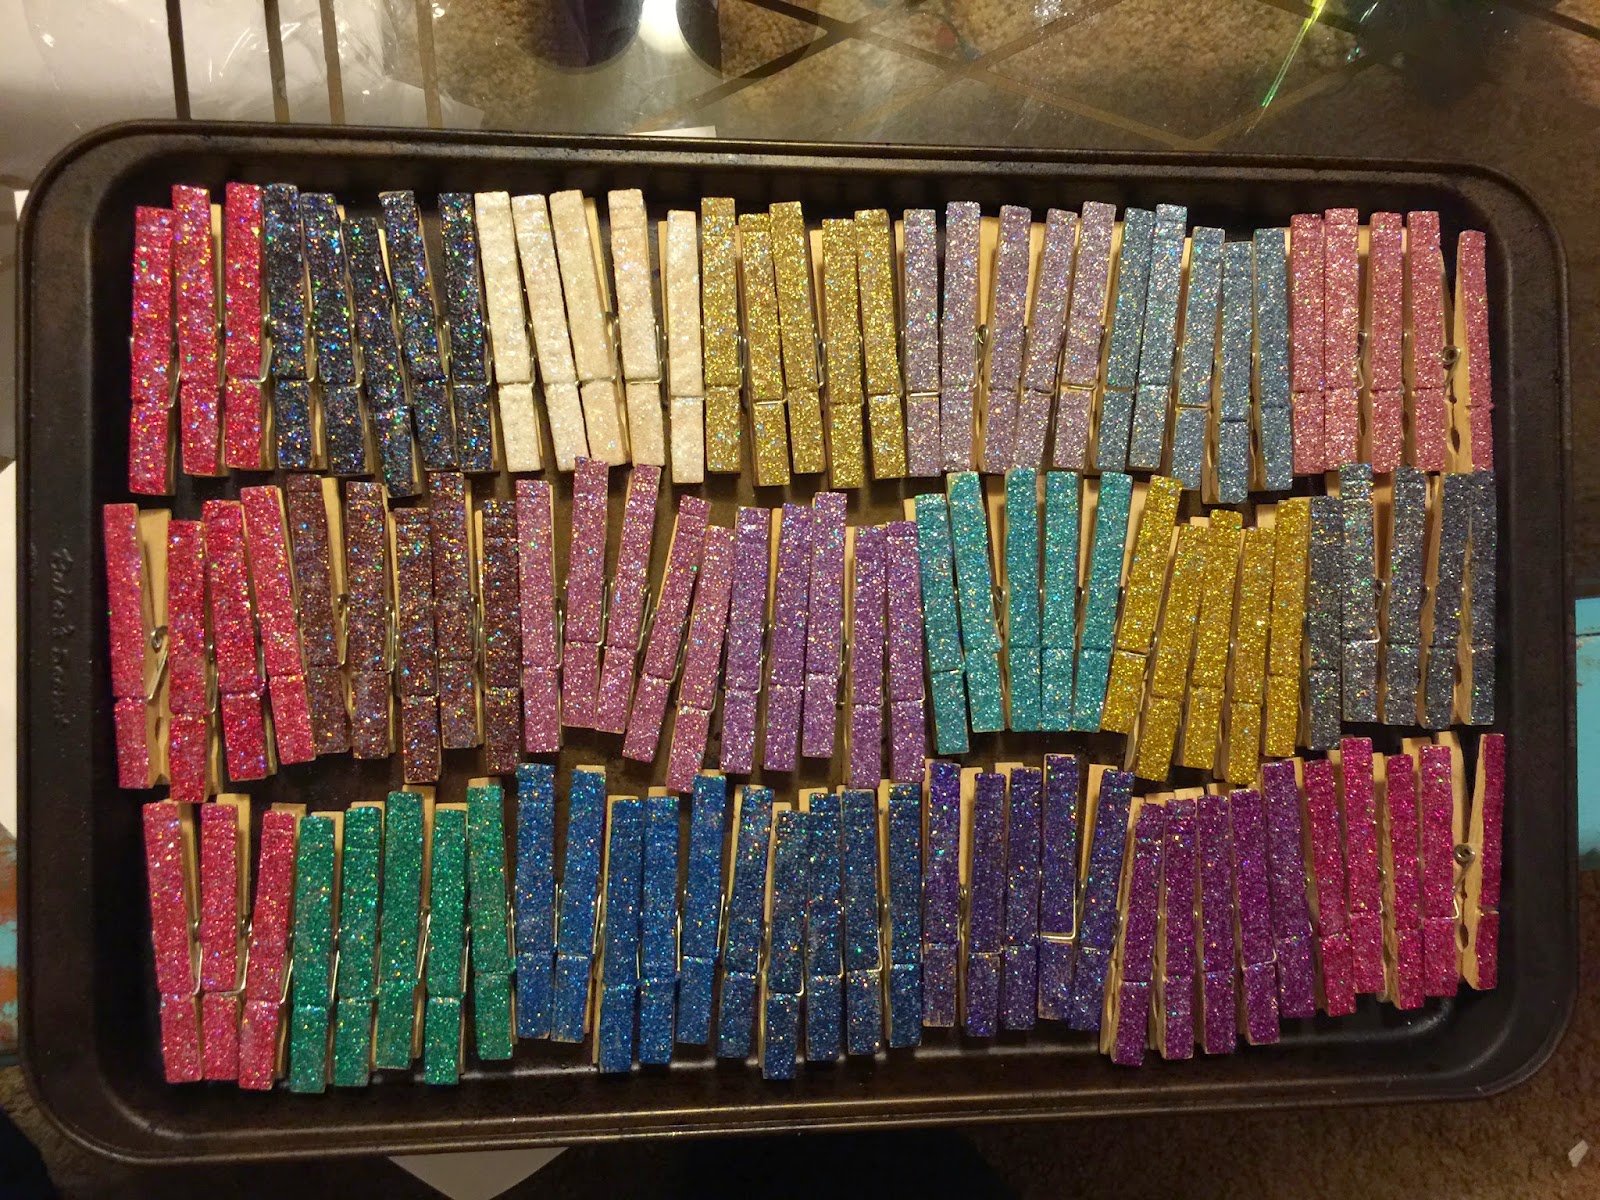
To glitterify your clothespins first put down a layer of mod podge, then cover with glitter. I would do a few of the same color at a time. Put a sheet of paper underneath them. Tap off excess glitter onto the page. Then you can pour the leftover glitter back into its vial. I liked the multicolored look, but you could make it all one color, or just two, etc.
Your clothespins should look something like this:

Once you've added the glitter and tapped off some of the excess put another layer of mod podge over it. The mod podge acts as a sealant and should prevent the glitter from rubbing off. So it's really important to use it. I suppose you could use a spray sealant instead. No one wants to be covered in glitter each time they get a tea bag.
Now here is where you get to make some choices again. There are lots of different mod podge versions. I used sparkle mod podge. It has iridescent glitter in it. I like to use this for almost all of my projects. You can use glossy, or matte, or any of the other myriad of varieties.

Here's the thing, like I said I usually love the rainbow style glitter effect from this one. I love the way the black glitter looks above, but you can see here after adding the sparkle mod podge, it overshadows the effect. For my next set I will probably test it out with regular glossy mod podge. Here I'll show you what I'm talking about:
See what I mean?

Here's the whole tray of my ultra glittery clothespins:

As I showed I painted my ring purple. You could paint it any color you want to. My husband suggested I added a layer of pink sparkly paint on top of this one:

Now it's time to use your hot glue gun to attach the clothespins onto your ring in regular intervals. Make sure when you glue them on that they have the opening, the pin bit, towards the outside. You want the tea bags to fan around the outside of your wreath. On the very top image you can see that I glued the clothespins part way through the circle. On the second one I made, I glued them on so the edge of the clothespin would be flush with the inner edge. I like the look a lot better, it seems more clean. You can however glue it on however you choose.
On this ring I used the sparkle mod podge over the purple paint.
I leave a spot free to add a ribbon to hang it up by. Again, this depends on your preference like so much in crafting. The original idea had the pins go all the way around, but left enough space between the pins to be able to use a wreath hook.

And here is another picture of the first wreath I made hanging up:

My future sister-in-law, Deedee, asked me about the possibility of being able to add Keuring cups onto a wreath like this. You might be able to get extra large clothespins, glue them on sideways and then fit them into the pin part. That's about the only way I could come up with. Wish I could be more helpful!

You can also put different things into the pins. Pictures might look really cute in a wreath like this.


November Birchbox

I signed up for Birchbox on November 30th I think. I got a November birchbox when everyone else received their December ones, and now I got the December one on Friday. I figured I'd still write up the November one as the product review can be useful, even after you could get it from birchbox. You could get it elsewhere too, so here goes.
Birchbox items come in a box instead of a bag like ipsy. The boxes are cute and I like them, but I do prefer the bags. I'm weird and like to keep all my stuff from each bag together, separate from other items I have. >_< I'm weird, but at least I know it, and own it!

The first item I tested was:
Elsor - Firming Collagen Day Cream  View here
The cream feels very thick, and left my face feeling and looking a bit greasy. I can't really speak to the firming properties, I don't doubt them though. I will keep using it though since it does feel very luxurious. It better, with a price tag of $85 for the full sized jar. That alone would prevent me from every buying it for myself.

Bain de Terre - Argan Oil & Passion Flower Color Therapy Styling Oil  View here
The oil smelled pretty good. I added it to my damp hair after a shower as suggested. It did make my hair feel sleek and manageable, however it did also make it look greasy and stringy once dried. That may not be the product's fault though. My hair has been much more prone to looking oily since I cut it short. They also suggest adding it to hair dye, I may just have to test that out. Or I'll use it later on when my hair is a bit longer.
$14 isn't too bad for a full sized hair oil. While I do recommend this, I am also a bit cheap and like products I can use for different purposes. I've used warmed up coconut oil with fresh sprigs of rosemary in it for my hair when it was long, and that stuff was awesome. Honestly though, this is not much more than getting coconut oil and it smells great. It couldn't hurt to try it if you have dry or color damaged hair.

Joie - Folle de Joie Eau de Parfum View here
Here's the little vial:
This perfume smells really great. It's very floral and sweet. I do like it a lot and will continue using it. I still like my favorite perfume, A Touch of Pink by Lacoste, better, but this does come in pretty close. However the $98 price tag is a deterrent for me. If I had a bunch of cash to blow I'd probably get a full sized one of this though.

theBalm cosmetics - Cindy-Lou Manizer View here
The packaging is really cute, and caught my eye immediately.
I enjoyed working with it and it went on pretty well. I used it as a highlighter. I applied some right under my eyebrows, on my cheek bones, and my T-zone.
Here are the results:

Not Soap, Radio - Joy Inducing Body Wash View here
I used this in my bubble bath on Friday and it was fabulous. The scent reminded me of something I used to get at The Body Shop when I was younger, but for the life of me I can't remember what it was. It made nice bubbles and smelled very refreshing. It is a birchbox exclusive and can only be purchased there. I don't think that $16 is an unreasonable price. So if anyone feels like giving me a gift because I'm just awesome, this would be a good choice. ;)

Sometimes birchbox will send and extra little goodie. I got this:
Dang - Toasted Coconut Chips View here
They were pretty good. I was surprised. I'm not huge on coconut chips, but these were really nice. They tasted sweet and had a buttery taste to them.


All in all I liked everything I received. It's so much fun to get to try out new things. I've really been enjoying my ipsy and birchbox items because it's letting me try new things I may not have thought to try on my own.
I do not get paid or receive free products for these reviews. I pay the same $10 per month that everyone else in the USA does. However if people sign up through the link I post below I do accumulate points that I can use towards free products at a later time.

Sign Up for Birchbox


Sunday, December 28, 2014

Limoncello

Almost two years ago I found a recipe that looked really intriguing and delicious. Then about half a year later I finally managed to get it started and try it out. Now this limoncello is an absolute favorite of my brother in law, Clint, and his wife, Brenda. So here I am making another batch for his birthday gift.
The recipe is from this website. The author is super friendly and responds to comments really fast if you have questions for her.

Feel free to check out her recipe and website. I want to make sure she gets the traffic for writing such a great post.

This is what you need! Two bottles of ever clear and about 20 lemons to zest. (Later on you will need 4 cups of sugar, and 6 cups of water)

Make sure you have a big container too.


Micro plane zesters are super useful, as well as super sharp and prone to slicing part of my thumb off... Be careful!


This is my fabulous getup:


Time to watch a bunch of Netflix and zest a million lemons.

Make sure you don't zest off too much. The white part of the peel is really bitter, so it's better to zest a bit too little off of your lemons than too much.


Look at all my zesty goodness:

And from on top:

Now dump your awesome alcohol into the jar:

Oh, yeah:

Now let it all marinate for at least a month! You'll know it's ready when the lemon zest pieces are all white and brittle.

Once it's been soaking for at least a month, add simple syrup. I just make my own really easy. All you need is sugar and water.
Simply dissolve 4 cups of sugar in 6 cups of water. Heat it in a stove. I let it come to a boil for a few minutes because it will be a bit of a thicker syrup. It's important to let it cool completely before putting the syrup into the jar.
Once you've added the syrup back into your jar, let it sit for at least another week. Longer if you can. The longer it soaks the more it can mellow. This will make the flavor more smooth.

After a week you can strain out the lemon zest. I recommend double straining it. I use a sieve and a coffee filter or a cheesecloth. The more finely it's strained, the clearer the alcohol will become. You don't really want any stray zest pieces clouding up your limoncello.

Here you can see I used a ladle to ladle the liquid into the strainers.

Because I like mine a little sweeter I made some more simple syrup. When bottling the limoncello I added a little extra syrup to the bottom of each bottle before I added in the limoncello.

I got these bottles, plus these two little bottles we made up for our friend Ryan's birthday:
My husband experimented with the new sealing wax my mom gave us for Christmas! I think they look crazy cool!

When you hold them up to the light they look a lot brighter, but as you may have noticed over these posts, I'm more of a night owl, so sometimes I'm lacking the light.

In conclusion this is a super easy recipe to make with only 4 ingredients. It's just time consuming, but only in the way that there is a long wait time, so not a long active time. So plan ahead. I started this in October or November so it would be ready for Christmas. It will stay good almost indefinitely.


Thursday, December 25, 2014

My lovely Christmas gift from Meyggy

My friend Meyggy gave me some fabulous makeup for Christmas. She's always so sweet and kind! And she is an absolute makeup goddess! Someday I hope I will be half as good as her. I'm kind of just a beginner at makeup. Growing up my mom never used a lot of makeup, so I'm still learning, and catching up slowly.
Aaanyway, here are the fabulous things she gave me. I figured I'd share them here because they are all makeup items.

First is this awesome lip balm:
I've been meaning to try the Eos lip balms for ages! I've just never gotten around to it. I love the optic, so distinctive and cute. This one is a citrusy scent, like a tangerin, or really it's like orange Fanta. It keeps your lips moist for such a long time! It's super good! I love it! It's definitely going into my purse for everyday use! I have to get all of the different flavors now! I'm obsessed! Damn you Meyggy!!!!! I like it even better than the ones I make myself!

So I'd been talking about wanting to change things up lipstick color wise. I usually gravitate to hot pink, with the variety being different kinds of pinks. Haha, not that much variety then. Meyggy's roommate Nessa works for Lancome and let me test out a bright red lipstick. The response was quite positive. I really liked it and got lots of compliments on it. Meyggy remembered this and gave what amounts to a red lipstick starter kit. It's so awesome! Then this week has been super hectic and I've overslept, so I never had a chance to test it all out until today while the Christmas turkey was in the oven.

So I did a bit of basic makeup and added some of my luminizer I got in my birchbox.
Still got that annoying zit on my chin! Any suggestions to help me with that? I'd welcome anything!

First I applied the lip primer Meyggy got me:
NYX Lip Primer View here

It's pretty much a nude shade:

Next comes the red lip liner:
jordana Easyliner for Lips - Sedona Red View here

I'm a bit shaky at applying the lip liner.
I've read about filling out the entire lip with lip liner, and then adding lipstick on top. I may have to try that out at some point. Also, I should have exfoliated my lips. Oh, well.

Now this lovely Mac lipstick:
MAC Retro Matte Lipstick - Ruby Woo View here

The total package:
I like the matte look of this a lot!

Finished applying all of it:


This is what it looks like all together:

She also gave me this fun lip gloss:
NYX butter gloss - BLG 12 Cherry Pie View here

It actually has quite a bit of color on its own. I applied it yesterday. I may have had a little bit of residue from other lipsticks on underneath, but mostly rubbed off.
It's not super bright, but nice on it's own too.

You can also use it the way I did to freshen up the red lipstick combo after it's worn off a bit like I did here:

All of it came in this fun little makeup bag:

Thank you Meyggy! I love everything so much! Gonna start getting out of my comfort zone and wear red more often! So much fun! I had a lovely Christmas getting all dolled up for my husband! I hope you all had an enjoyable Christmas too!